Thursday, 23 July 2015

Banana Chocolate Walnut Muffin Tops

I came across a gluten free muffin top recipe and decided to modify it a bit. Nothing tastes better than gluten! (To those of us without celiacs or a sensitivity, anyway) So I added back in some gluten and swapped the coconut sugar for raw sugar and it worked like a charm! 😃

Here goes kids! Pre-heat the oven to 355 degrees. In one bowl mix:

- 1 ripe banana
- 1/2 cup melted earth balance
- 1/3 cup raw sugar
- 1/2 tbsp vanilla 
- 1/2 tbsp molasses
- 1/2 tsp salt
- 1/2 tsp baking soda 
- 1/2 tsp nutmeg
- 1/2 tsp cinnamon

Hand mix and once mixed well, add in:

- 1 & 3/4 cup whole wheat flour
- 1/2 cup chocolate chips
- 1/3 cup chopped walnuts

Mix again and then using a large cookie scoop drop onto a parchment lined cookie sheet and bake for 15-17 minutes or until golden. Transfer to a wire cooling rack and enjoy! 


Tuesday, 2 June 2015

BBQ Seitan Ribz!

Saucy. Crunchy. Chewy. Ribz. 

That is what Faith requested. After trying lots of different recipes for Seitan Ribz I found online, this is the best one yet! 

You'll need:

2 cups vital wheat gluten 
4 tbsp nooch
2 tbsp smoked paprika 
4 tsp onion powder
2 tsp garlic powder
1.5 cups vegan needless broth, concentrated* 
1/4 cup green lentils (canned or cooked)
2 tsp liquid smoke (I used hickory)
2 tbsp tamari 

Preheat the oven to 350 degrees. 

Whisk all dry ingredients together in a bowl and set aside. In a food processor, blend the green lentils with the tamari, liquid smoke and enough broth to make a paste. When the lentils are sufficiently broken down, add the remaining broth and pulse. 

*for the broth, when I make it from "cube" form it calls for 1/2 a cube for 1 cup of boiling water. Instead, I do 1 whole cube to 1.5 cups water to make it more concentrated. 

I have a ninja system, so I swap the blade for a dough hook and add the dry to the wet. If you don't, you can mix with a spatula by hand until you think your arm might fall off. Then go for another two or three minutes and stop.

Once your dough is well mixed, transfer onto a parchment lined cookie sheet and punch/hammer/beat into as rectangular of a shape as you can. The dough will be elastic like but stay with it. It's ok if some parts are thicker or thinner. Even some holes are ok; they'll all get sauced and bbq'd later anyway. 

Bake for 25 minutes, then flip over and bake for another 5. Once cooled, cut one slice down the middle and every inch or so horizontally into "rib" shapes. 

From here, you can sauce and BBQ on the top rack for 5 minutes per side or marinade in BBQ sauce for a day or two before grilling. 

Grilling tip: Cook on the top rack, because they're already cooked you just want to crisp them up and with the amount of sugar in BBQ sauce they can burn really easily. 

Also, reserve a little extra sauce to drown them in while plated and there you have it. 

Saucy. Crunchy. Chewy. Ribz. Enjoy!


Tuesday, 12 May 2015

Pistachio Halva Shortbread!

It has been an EMBARRASSING amount of time since my last post. I have so many blog posts rolling around in my head (there's lots of room!) but have been really busy and unable to put fingers to keyboard to make it happen. 

I'm hoping that in the next couple of weeks so I can find some time to sit down and get them all typed up and ready to rock 'n roll, so please hang tight! 

In the meantime, I will start with this gem of a recipe. In my fridge has been a sad lonely container of pistachio halva. I bought it a while ago with the intention of doing something with it, so I wasn't sure what. I got the idea to do something with halva after eating one of my friend Ruben's dee-licious halva cupcakes. 

After a quick google search, I found a great recipe that I was able to veganize. 
These are easy to make and absolutely beautiful- not to mention delicious. 

You'll need:

1 cup flour 
1/4 cup sugar 
1/2 cup salted Earth Balance, softened 
1 tsp vanilla 
24 1/4" halva cubes 

Topping:
1 tbsp sesame seeds, toasted
1/4 cup vegan chocolate chips
1 tsp coconut oil

Preheat the oven to 325 degrees and while it's pre-heating toast the sesame seeds and then set aside in a small bowl.

In a large bowl whisk the flour and sugar together. Next, mix in the half cup of Earth Balance until well mixed. Finally add the teaspoon of vanilla. Knead the mixture until it is consistent. 

Chop your halva (which usually comes in a large brick) into 1/4" cubes. 

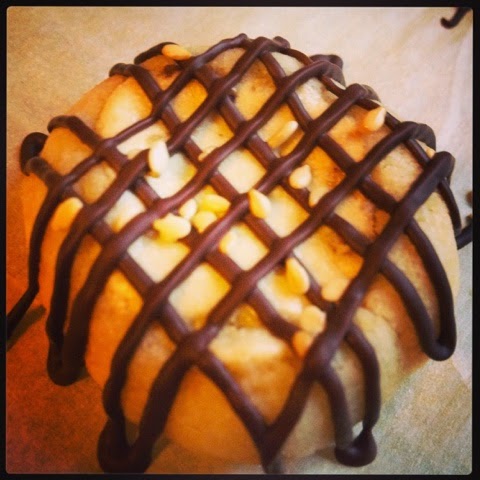
Using a small cookie scoop, scoop 24 teaspoon size cookies onto a parchment lined sheet. Next, press the halva cube into the centre of the cookie and form the batter around it, leaving the top exposed completely. 


Now place the cookie sheet in the freezer for 15-20 minutes. This will stop the halva from spilling over while baking. 

When they're ready, bake for 20 minutes until the edges start to turn golden brown. 

While cooling, melt your chocolate and coconut oil mix over a double boiler and pour into a piping bag. 

Next, drizzle the chocolate over the cookies in any desired pattern (I did thatched) and sprinkle with the toasted sesame seeds. 

Cool completely and enjoy!


Sunday, 18 January 2015

Coconut Nog Cookies!

Ok, you would think I miss the holidays or something baking these in the middle of January. Truth be told, I just have SO MUCH nog left over from the holidays that I don't know what to do with it all. If that isn't a first world problem, I don't know what is! 

Without further adieu...

2 cups flour 
2 tsp baking soda 
1/2 tsp salt
1/2 tsp cinnamon
1/2 tsp nutmeg 
3/4 cup sugar 
1 tsp vanilla 
1/3 cup oil
1/2 cup coconut nog + 1 tsp 

You know the drill. Mix the dry, add the wet and portion onto a parchment lined cookie sheet. I needed to add a tsp or so extra of coconut nog because the mix was too dry.  I have a small cookie scoop that I use. These will spread a little but not much. 

Bake at 350 degrees for 15-17 minutes and then let cool. 

These are delicious on their own or you can glaze them! I made two different glazes.

Spiced Rum Glaze:

1/2 cup powdered sugar
1/2 tsp spiced rum
1.5 tsp coconut nog 

Mix until thick, but wet. Then dollop a 1/4 tsp on top and it will run down slowly. If it's too thin it will just make your cookies soggy. 

To make it un-boozy you simply omit the rum and increase the coconut nog. 

Sprinkle a little cinnamon on top and enjoy! 


Friday, 16 January 2015

Kidney Bean Salad

I don't know what else to call this. 

I started off trying to make mock tuna. I diced all of my onions and then opened a can of what I thought was chick peas... 

FOILED! It was kidney beans! WTF?!  I literally spent the next 30 minutes tearing the pantries apart in search of chick peas. There were none. HOW IS THAT EVEN POSSIBLE?! That's like running out of nooch, or cashews. IMPOSSIBLE. I am still in total disbelief, maybe even denial. (They're here SOMEWHERE!!!) 

In the mean time, I had a large red onion chopped and a hankering for a Just Mayo based salad. Mock tuna was out- but what could I do with kidney beans? 

This. I did this. And sweet mother jeebus it is divine. Here is my best recollection of the recipe with made up measurements. 

1 can kidney beans (28oz)
1/2 cup Just Mayo 
3-4 garlic dill pickles, chopped
1 medium/large red onion chopped
1 tbsp tamari 
1 tbsp horseradish
1 tbsp Dijon mustard
1 tsp onion powder
1 tsp garlic powder
Salt and pepper to taste

Mix everything except the onions, pickles and beans. Then add the pickles and onions. Last, add the beans and stir to coat. Now, eat directly from mixing bowl, or you could top your favourite cracker, load up your favourite bread, wrap it up. Whatever you do, just enjoy! It's delicious!


*Do you ever make something SO good, but it's impossible to take a good photo of? It's late and I'm tired and quite frankly, keep eating my model. This is the bean salad on a toasted jalapeño baguette. (Teeny bite size to feign sophistication! 😆)

Sunday, 11 January 2015

Waffle All The Things!

It's not a new craze, but waffling food other than waffles is pretty amazing. Waffle irons are pretty versatile. You can cook tofu, hash browns, cookies and more. 

I wanted something brunchy today and decided to try an experiment. Sometimes they work, sometimes not so much. Lucky for you all, this one worked. 

Banana Oatmeal Chocolate Chip Waffles

1/2 a banana, smashed
1/2 cup quick oats
1/2 cup organic pastry flour
1/4 tsp baking powder
1/4 tsp baking soda
1 tsp vanilla 
1/4 cup chocolate chips
3/4 cup almond milk 
Pinch of salt

You know the drill. Mix dry, mix wet, combine and pour into the waffle iron. Voila. 

The shell crisped up nicely in the waffle iron and the inside was cakey and oatey like I wanted it to be. The chocolate chips got a little toasty for my liking- in future I would probably add them after the fact, or just make a chocolate drizzle. This would also work well with raisins.

Being the glutton that I am, I added coconut whipped cream and cinnamon to mine. You should do the same. It was spectacular. 


Note: if you wanted to make it sweeter (I didn't add any sugar to the mix) you could add 1/4 cup of sugar.


Tuesday, 23 December 2014

Sausage Rolls!

Seitan is something that I usually buy, but rarely make. Which is silly, because it's not difficult to do and tastes so much better home made. 

The basics of Seitan are wheat gluten and spices (the "dry"), mixed with water/stock and a binding agent (the "wet"). When I make my Seitan ribs I use natural peanut butter as the binding agent, but for sausages I wanted a different flavour. I have seen in other recipes that some people use beans so I thought I'd give it a try. 

To make the sausages you'll need:

The "wet":
3/4 cup baked beans in tomato sauce
2 tbsp minced garlic
3 tbsp tamari
1/2 tbsp hickory liquid smoke 
2 tbsp chili oil (or olive if you don't want them spicy)
1.5 cups vegan beef broth 

The "dry":
2 cups wheat gluten 
1/3 cup nooch 
2 tsp smoked paprika
1 tsp chili powder
1/2 tsp black pepper
1 tsp ground sage
1/2 tsp onion powder

In a food processor thoroughly mix the wet ingredients until smooth. Switch the blade to a dough hook and add in the dry mix until a batter forms evenly.

Using lengths of heavy duty aluminum foil  add even mounds of batter and roll into sausage lengths, twist ends closed. Repeat until all batter is used, 8-10 sausages depending on size.

Bake in the oven at 350 degrees for 40 minutes and let cool in the foil. 


Now that you have sausages, the possibilities are endless! BBQ and top with sauerkraut and mustard, slice and fry for pasta dishes, or create some great holiday apps! 

To make sausage rolls, once cooled you need to slice them in half and cut into 1.5" sections. 


Roll out your puffed pastry and wrap each square evenly. Bake at 350 for 25-30 minutes or until golden brown.


Serve with specialty mustard, and enjoy!

Friday, 28 November 2014

When you dip, I dip, we dip!

Firstly, who gets the song reference? Hooray for 80's kids! 

Moving along.....PIZZA!!! Now that Pizza Nova has vegan mozarella, at a reasonable price no less, I can once again embrace my inner (ok; maybe outer  too...) fat kid and eat my feelings via take-out! 

The one thing they don't have is a vegan dipping sauce. My fave FAVE dip was the Cheddar Jalapeño dip that most pizza places carry. So creamy, and cheezy and with a nice bite.

When you order pizza that you're too lazy to get dressed to drive and go pick up, it leaves a 40 minute void. Mostly, this time is filled with peeking through the curtains brimming with hope that THAT car has your pizza, contemplating getting dressed to exchange money for carbs (but ultimately deciding against it) and/or swearing and wishing that they would just HURRY UP WITH MY PIZZA damnit!!

Maybe I'm maturing, because I spent my 40 minute void concocting dipping sauce! Truth be told, I ordered pizza on several different occasions which gave me the opportunity for trial and error. There wasn't a lot of error, per se, but I did find a great recipe that tastes amazing and is easy peasy.

Without further adieu, VEGAN CHEEZY JALAPEÑO DIPPING SAUCE!!! 😁

1 cup vegan mayo (I used Nayonaise)
1/4 cup nooch (or more if you want it really cheezy. Always add more nooch!)
2 tbsp hot sauce (for both added heat and colour)
1/2 a jalapeño, finely diced

Add all ingredients into a blender and purée until it's a nice saucy consistency. If it's too thick for your liking, add a bit of liquid. Water or unsweetened, unflavored milk will do. 

Enjoy!

Sunday, 23 November 2014

Baked smashed potatoes!

I'm tired and cranky. The kind of tired and cranky that only starch can fix. Bring on the potatoes! 

I bought a few bags of those little mini potatoes. They might have a real name, but I already said I'm tired. After boiling them, I arranged them on a parchment lined paper and used a wooden spoon to smash them. 

You can really garnish them with anything you want, but I used:

- Earth Balance
- Sea salt 
- Fresh minced garlic 
- Scallions, chopped finely 

Pre-heat the oven to 375 and bake for 35-45 minutes. Then, eat all of your feelings and hopefully be a little less cranky! 


Wednesday, 12 November 2014

Pierogi!

Starch fried in (vegan) butter may as well just be called HEAVEN! 😍

Oddly, not everyone agrees with that. As you may have gathered from previous posts, my other (better) half doesn't like a lot of my favourite things. Like bread, sandwiches, pierogi. Basically, if it's starchy and or fried, she wants none of it. She likes her food to be nutritionally complete, where I like mine to replace feelings and cause bloat. I know, I'm not sure how we make it work, either. 

So I wanted to try something that kind of met half way. Let me have my fried starch while being (somewhat) nutritionally complete. So I thought, why not use processed chick peas in lieu of potato, add a ton of nooch and some other good stuff? Win win? I think so!

To make the pierogi shell, I googled and came up with this:

3 cups unbleached all purpose flour 
1/2 tsp salt
1/4 cup sunflower oil 
1 cup warm water

Blend flour and salt in a food processor, then add oil and water and mix until combined. Hand roll into a ball and set aside while you make your filling.

For the filling I used:
- 1 large 28oz can of chick peas, rinsed and puréed in the food processor
- 2 medium white onions, finely chopped
- 1 tbsp fresh minced garlic
- 1/2 tbsp ground sriracha (aka THE GREATEST SPICE EVER!) 
- 1/2 tsp turmeric
- 1/4 cup nutritional yeast

In a large frying pan, sauté the onions and garlic. Then season with sriracha (or other spice with a nice heat) turmeric and nutritional yeast. Lastly add in the chick pea mix and combine well. 

On a floured surface roll out the dough to desired thickness. Use a cup to make the shapes for your pierogi. Spoon one tbsp of filling onto the centre of the shell. Pinch near the middle to seal and then continue along both sides until you have a crescent shape. (See photo for detail)

Once they're all formed, crimp edges with a fork and get ready to boil. Do not overcrowd the pan; only boil 3-5 at a time and then set aside. When they are all done, preheat a large frying pan and sauté in vegan butter until lightly browned on both sides. 

Top with your fave vegan sour cream (or not) and enjoy! 


Sunday, 19 October 2014

Nacho Cheez!

I'm back! Two weddings, three events and the general chaos of life has subsided (kind of) and I'm back to the blogosphere! Yay!

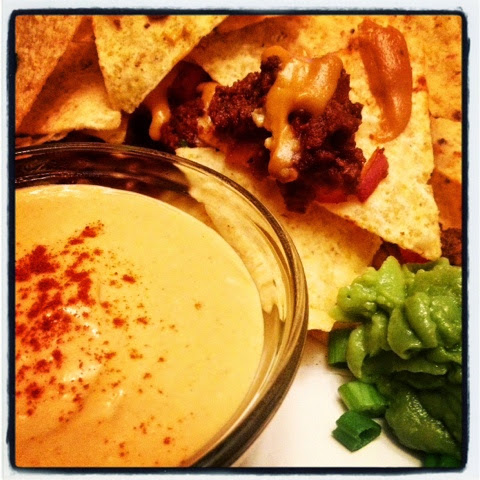
Nacho night is one of my fave nights. I bought Yves new soy free veggie ground round with pea protein and figured the best way to try it out would be spiced into oblivion with veggies from our garden. And then I had a hankering for nacho cheez sauce. You know the kind that you see at the 7-11, except minus the plastic-y look. Without further adieu...

Nacho Cheez Sauce

1 cup hot water
1 cup raw cashews
3/4 cup nooch (nutritional yeast)
1.5 tsp salt
2 tbsp lemon juice
2 tbsp pimento, drained
1/2 tsp onion powder
1 tsp garlic powder 
1 tsp smoked paprika 
1/2 tsp cumin
1/2 tsp cayenne pepper
1 tbsp tapioca starch
1 whole jalapeño, diced 

Blend well in a high powered blender with nut blade attachment and voila! Creamy, tangy, spicy cheez sauce!


Saturday, 20 September 2014

Toffee Apple Pie!

Every fall I bake a billion apple pies. Every year I say I'm going to learn to make my own crust and NOT use those oh-so-convenient pre-made, ready to roll crusts. This year, I actually made my own!

I'll include the recipe, but truth be told it is finicky and may need alterations to make sure it's the right consistency. 

For the crust:
2 cups of unbleached, all purpose flour 
1 cup of vegetable shortening 
1/2 tsp salt
1-3 tbsp cold water

Combine salt and flour. Using a pastry cutter, add in 1 cup of shortening. Once combined well, knead with your hands and start sticking it together into a giant ball. Add cold water 1/2 tbsp at a time until your dough is moist enough not to crack, but not too sticky that it is too doughy. (I told you, finicky!!) 

Once it's in good form, split into two and roll out onto a well floured surface. Place the bottom into your pie plate and roll out the next half for the top. You'll need to cut it into strips to make a lattice top. Mine is ugly, yours can be too. You need the lattice top for the toffee. 

Peel, core and slice the apples and fill the pie plate. Make it nice and tall because it'll cook down a lot. You don't need to add anything to them. Add your lattice top and set aside while you make the toffee. 

Preheat oven to 425. 

For the toffee:
1/2 cup of earth balance
3 tbsp flour
1/4 cup of water
1/2 cup unbleached cane sugar
1/2 cup brown sugar

In a saucepan, melt earth balance. Add flour and whisk until smoothe. Add in water and sugars and bring to a boil, then reduce to a simmer. 

Using a large spoon (I suggest silicone) spoon the toffee over the lattice of the pie. You'll want to take your time because you want the mixture to seep into the middle. Make sure all of the lattice is covered and as much of the crust as you want. 

Mine always looks messy because I like the mix of the sticky crunchy toffee with the soft crumbly crust. 

Place in the middle of the centre rack and bake for 15 minutes, then reduce head to 350 and bake for another 35-45 minutes or until the crust is golden brown.

What you should now have is a crunchy, chewy toffee apple pie! Let cool before serving. Enjoy!


Sunday, 31 August 2014

Maple Smoked Tempeh Facon!

I know very little about bacon other than the obvious. It comes from pigs (😔), the smell is so strong it's nauseating and overwhelming and it is really, REALLY popular. I have never eaten it and I don't really get it. 

I bought some tempeh at the grocery store and decided to make one slice (literally) of tempeh facon (fake bacon). My wife is always my guinea pig for these types of experiments and she immediately asked for more. I played around with different marinades, different thicknesses of tempeh slices and different baking temps and times. What I came up with is this little slice of facon heaven...

Warning: There are literally NO measurements, sorry. (Kind of) The measurements will depend on how much facon you're making. It needs to marinate in a single layer and you want the marinade to cover the top. I suppose you could use something more small and shallow but I havent tried that so I cannot confirm or deny... Moving along! 

Marinade:
A generous pour of olive oil
A half as generous pour of cider vinegar
An equal pour of maple syrup 
A medium sized splash of liquid smoke (I used hickory)
A medium sized splash of tamari 
A good amount of smoked paprika 
A good amount of cumin 
A healthy dash of black pepper 
A healthy dash of salt 

Mix all ingredients in a large shallow dish and then add in your sliced tempeh. You can cut it to whatever thickness you prefer.) Cover tightly and refrigerate for 24 hours. 

When you're ready to bake your facon you'll need to preheat the oven to 300 degrees. On a parchment lined sheet lay each slice of tempeh side by each and bake for 7-10 minutes or until they're toasted nicely. Keep a close eye though because the maple can make the edges burn quickly! 

Once done, remove from the oven and let cool. Once cooled, crumble on salads, add to sandwiches or just eat on it's own! Enjoy!


Tuesday, 26 August 2014

Chocolate? Peanut Butter? Pretzels?

No one is going to believe me anymore that I don't like sweets. Especially if they just saw me make sweet eating love to this cupcake. 

This all started when I saw waffle shaped pretzels on sale at the grocery store. The only thing I love more than salt is a good bargain. Salt on sale? SOLD!

I've been doing lots of chocolate lately so I guess you could say it's been on my mind. Then it happened. Chocolate dipped pretzels. Before I knew it I was melting away over a double boiler and dipping away. To be clear, I'm not sorry. I'd do it again. LOOK AT THESE BEAUTIES! 


So in the fridge they went and back to life I went. The idea of un-hinging my jaw and dropping the whole tray in crossed my mind, but I thought that they were too pretty to devour in such haste. 

So naturally, I thought of cupcakes. Vanilla? Caramel? Chocolate? YES! Chocolate! But what about icing? I thought about the same old; chocolate, vanilla, caramel.  And then I remembered my old friend Reese's. Peanut butter! 

Once I have my mind set, I just DO. So when I came home from work today I whipped up a quick batch of chocolate cupcakes so that they could cool while I was a hollering soccer mom and be ready to ice and decorate. 

While it did take some prep work and planning these are SO worth it. Without further adieu, the recipe to the best of my recollection! 

For the pretzels: 
1-1 1/2 cups vegan chocolate chips
1/2-1 tsp coconut oil 

Melt over double boiler (or microwave in 30 second increments in a microwave safe bowl), dip and lay on a parchment lined cookie sheet. Move to fridge to set and voila.

Chocolate cupcakes:

1 & 1/4 cup unbleached flour 
1 cup organic sugar
1/4 cup unsweetened cacao powder
1 tsp baking soda 
1/2 tsp salt
1 cup warm water 
1 tsp vanilla 
1/3 cup vegetable oil 
1 tsp apple cider vinegar

Mix your dry ingredients, add your wet and combine. You can do this in two bowls if you insist, but one is just fine so long as you whisk the dry ingredients first and create a divot in the middle. 

Bake at 350 for 17-20 minutes or until a test stick comes out clean. Then set aside to cool and start your icing!

Whipped peanut butter icing:

Ok, sorry to my measuring friends but this is LITERALLY a 2:1 recipe. I used approximately...

1/2 cup earth balance
1/2 cup peanut butter 
1 cup powdered sugar 
Splash of almond milk

It is ridiculously hot today. 40+ Celsius with the humidex. It's gross, but it did make icing prep easy! Combine the earth balance and peanut butter until smooth. Add the powdered sugar and mix well. Add a splash of milk until the icing is thinned out but not watery. Then using your electric mixer go to town. 

When you're ready, pipe the icing onto the cupcake and then angle the chocolate pretzel on top. 


Make sure you have friends to share with or you may eat them all. Enjoy!


Sunday, 24 August 2014

Ganache, Nuts & Requests!

99% of my food requests come from my other half. Sometimes they're easy ("Babe, I want a salad!") and sometimes they're uh...not. ("Babe, I want a vegan lamb stew!") 

I have been making hella truffles lately which means I have hella ganache sitting in the fridge. Tonight's blog post is brought to you by, "Babe, I want Ferraro Rocher!"

Admittedly, this first round is SO delicious, but not 100% where I want it to be. I have some ideas to mimic the cookie wafer shell. I'll update when I get around to it. 

In order to make ganache, it's a bit finicky but so worth it. You'll need:

1 cup of vegan chocolate chips
1/2 cup of full fat coconut milk
1/2 tbsp vegan butter, melted

Bring the coconut milk to a boil and pour over the chocolate chips in a bowl. Let sit for two minutes and then stir until well combined. Then stir in the vegan butter and transfer to a shallow dish to cool. (I used a glass lasagna dish.) After a few hours, it should be cooled completely, now you will have to cover and refrigerate over night. (I tried every possible cheat. It won't work unless you follow these steps. Drats!) 

Fast forward 24 hours and you now have endless possibilities with your ganache! You can roll it into spheres and top with cacao, chopped pistachios or pecans and you've got killer truffles. 


Or if you want to make someone you love happy and take a lot of time making something amazing, make THESE!


You'll need:

Whole hazelnuts 
Coarse chopped hazelnuts 
Vegan chocolate chips
Coconut oil 
Parchment lined cookie sheet

"Wrap" the hazelnut with the ganache. Roll in the spheres using the palm of your hands. If the ganache gets too soft just take a break and throw them back into the fridge to firm up. 

Next, roll them in the coarse chopped nuts. Then in a small bowl heat chocolate and coconut oil until it is fully melted. Roll the spheres in the chocolate mixture and spoon them out onto the cookie sheet to set. Sprinkle with chopped nuts if desired. Let firm in the fridge and enjoy!! 

Saturday, 9 August 2014

Besan Omelettes

Brunch. That gluttonous massive meal when you've slept in and want to eat your weight in something, anything. Preferably something greasy and carby to help you forget that you made the mistake of opening and finishing that second bottle of wine (and bag of chips) the night before.

Ok, maybe that's just me. But even people who don't often suffer the morning after the night before like a good brunch. Which brings us to Besan Omlettes.

Like any good vegans, we always have heaps of onions, peppers and other veggies on hand. I also really REALLY like spices. Not just the ones with heat, but ones that add dimension and flavour, too.

Besan, is ground chick peas for those who don't know. Chick peas can do no wrong in any form. That's not just my opinion, it's actually 100% factually true. They're perfect for everything from mock tuna, burgers, salads and yes - even flour.  It has a great binding ability and the flavour is everything you'd expect from a ground chick pea. 

I'm going to make up measurements as close as possible to what I actually did for a certain friend who doesn't like a simple "2:1" explanation. 

Besan Omelette Batter
1 cup besan flour 
2-3 teaspoons of your favourite spices. I used 1 each of roasted red pepper flakes, roasted garlic and powdered habanero
1/2-2/3 cup of milk (I used sunflower)

Mix your spices into the flour and then add the milk slowly while stirring to avoid lumps. You want your batter to be thick enough to fold. It should stick to a fork for 1-2 seconds before slowly running through.

Set aside the batter and work on your filling. I used fried onions, red peppers and spinach in mine. When your filling is ready remove it from the heat and start the omelette. 

Preheat a frying pan (with a lid) to medium-low heat. Melt a good dollop of vegan butter into the pan and when it's melted pour or spoon in the batter. You'll want to swirl the pan to make sure that you just get a nice 1/4" coating on the bottom of the pan. Cover with the lid until the top is no longer shiny and looks cooked. Add a generous amount of your toppings on one side, use a spatula to fold in half and voila! An amazing, savoury besan omelette. 


Tuesday, 5 August 2014

Sunday August 10th at Studio.89!

I am so excited to be doing another pop-up, this time in Mississauga at Studio.89!

Studio.89 is a great space, with great people and a great mission! Great! :D 

For more info on them and their mandate, check out their website:

www.studio89.org


Monday, 28 July 2014

Roasted Jalapeno & Corn Hummus

Chick peas, am I right?? They're pretty spectacular. They can do no wrong. Ever.

I bought jalapenos with the best of intentions of making some grande dish that I never got around to. And I had fresh local corn that I was going to BBQ, but never got around to it. See a theme here?? Like I said in my last post - WE'RE BUSY!

One thing that we always have in apocalyptic quantities in our house is chick peas. Because they're awesome. I don't ever need a special occasion to make hummus. I can pretty much eat it out of the jar with a spoon, as a spread on sandwiches, as a dip for fresh veggies, nacho chips or pita. Yum, yum, yum!

While looking for something to use my sad looking corn and jalapenos for, I found this gem. A couple of mods later, and there was hummus! (And then a few hours later, there was none!)

Hot Mess Warning: This will not be a Siobhan approved recipe. There will be no measurements. :)

For starters, I always pour a healthy amount of tahini into my food processor with a good splash of lemon juice and whip that first. It's the secret to creamy hummus! Then add in your drained and rinsed chick peas and pulse until coarsely chopped.

In the oven on low broil, I blackened the corn and at the end added the jalapenos. It took about 15-20 minutes. When they were done, I chopped the jalapenos and used a sharp knife to cut the corn from the cob and threw it all into the already coarse chopped chick pea mix. I turned on the food processor on low and started pouring in olive oil until the hummus was thick and smooth and lovely.

I didn't think to take a picture of it, though it was quite pretty. It's far too late now. But I did take a photo of the roasted jalapeno and corn. That'll have to do. Cheers!


Deep Fried Avocado Tacos

I don't know about you all, but avocados are one of my favourite foods. I eat at least one a day. I know that there are some people out there who panic and fret that "avocados are so high in fat, though! You shouldn't eat that many!", to which I reply PPPFFFFTTTTTTT.

When did fat become the enemy?? And is it the "fat" in avocados that people are afraid of or literally BEING fat? Either way, my PPPFFFFTTTTTTT still stands. I'm no professional or anything, but my motto when it comes to food is simple. Whole over Processed. Mostly in moderation (Because we all need a bag of chips and a bottle of wine for dinner now and again, or is that just me??) and get off your butt and DO SOMETHING. I'm not selling an illusion here; I'm not some primed Olympic athlete - but we walk the dog, go for family bike rides, cut the grass, work in the garden, work Cedar Row Farm as often as possible and just generally are busy people. I take the stairs  I deserve an avocado or two. :)

Now, onto the good stuff. I originally saw this recipe online somewhere, but it was very un-vegan. It called for buttermilk and loads of eggs. It really only served as inspiration for deep frying my own avocados so I don't feel schmucky not linking to it. As with most deep fried foods, you will need three bowls. That way you can make a really big mess and thrice the dishes.

Bowl # 1:
- 1/2 cup of flour
- 1 tsp garlic powder
- 1/2 tsp onion powder
- 1/2 tsp habanero powder
- 1/2 tsp dried cilantro flakes

Bowl # 2:
- 1 cup milk (I used unsweetened almond)
- 1 egg replacer (I used Ener-G, but Flax would also work)

Bowl # 3:
- 1 cup Panko bread crumbs
- 1 tbsp dried cilantro flakes (Because you can NEVER have too much cilantro!)

In a large heavy bottom sauce pan, heat about an inch and a half of oil medium-high. I don't have any fancy thermometers, I just splash some water in and when it fires back at me I know it's ready. Safety first! lol Depending on the size of your avocados, or your mouth I suppose, slice it in quarters or eighths.

Hot Mess Tip: Before you start frying, make sure you have a plate ready with paper towels to transfer them to. Also, you'll want to eat them right away so have your plates ready and waiting. I used corn tortillas, chopped iceburg lettuce, garden fresh tomatoes and fresh cilantro and green onion.

With your avocado sections, coat evenly in bowl 1, transfer to bowl 2 and then into bowl 3 for the Panko. Don't skimp on the Panko. Press it right into it! Repeat until all avocado is coated and ready to go. I laid mine out on a cutting board so that I could do them all at once but if you allow help in the kitchen there's no reason you couldn't use teamwork here.

You can use tofutti sour cream, or daiya cheez on your tacos but I wanted a rich, creamy, spicy sauce to top off my tacos with so I whipped up this:

3/4 cup Vegenaise
2 tbsp lime juice
2 tbsp Sriracha Hot Sauce
2 green onions, chopped. I used my herb scissors.
1 large bunch fresh cilantro, chopped with scissors

The end result? THIS.


Monday, 21 July 2014

Moxarella ON EVERYTHING!

Very rarely do I get THIS excited about things. (That may be an absolute lie.) but I am really REALLY excited. So excited in fact, that I just used caps locks on five words, including the title. Good grief!

Those who know me, know I'm not a big fan of faux cheeses. Actually, that's a little general. Specifically I don't like processed faux cheeses. They just taste so weird to me! I had good luck with the tofu ricotta for the stuffed shells. Then I saw this little gem and thought it was worth a try. I did not make the whole pizza recipe - just the moxarella. I had very low expectations. Very low. Almost non-existent.

But something beautiful happened. It was easy. Like, really, really easy. And cheap. Tapioca starch is only .99 cents for a lifetime supply and the cashew count is only 1/4 a cup. And friggin' delicious. It has the perfect mix of salt and tang and it's creamy and light and wonderful.

As the original recipe states it isn't a good replacement for a Caprese salad but baked it is 11/10.

Copied from One Green Planet:

  • 1/4 C. raw cashews 
  • 1 C. hot water (NOT boiling)
  • 2  T. + 1 t. tapioca starch
  • 1 small garlic clove, minced
  • 3/4  t. sea salt
  • 1 t. fresh lemon juice

After chilling it and using it on pizza with some tomatoes from our garden and a sweet basil base sauce I had lots left over.


I got to thinking. What if I roll them in a mix of panko and herbs and bake them? And then inhale them like my life depended on it? Yes please. The moxarella is really "sticky" so you'll need to wrap it in saran wrap. Oddly it doesn't stick to knives or other objects, just fingers. Anyhow, the breading was easy to make. On a silpat, or sheet of saran wrap mix:

1 cup panko crumbs
1/2 tbsp oregano
1/2 tbsp basil
1 tsp garlic powder

Cut the moxarella into "sticks" and roll into panko mix. They will flatten and roll out as you go. Repeat for as many as you'd like. Arrange on a parchment lined baking sheet, spray with canola oil (If you want them more like fried, as opposed to baked) and bake at 425 degrees for 5-7 minutes per side or until golden brown.


You can dip them in whatever you'd like. I made a quick vegan ranch dressing dip. This one's good.

Enjoy!