Monday, 28 July 2014

Roasted Jalapeno & Corn Hummus

Chick peas, am I right?? They're pretty spectacular. They can do no wrong. Ever.

I bought jalapenos with the best of intentions of making some grande dish that I never got around to. And I had fresh local corn that I was going to BBQ, but never got around to it. See a theme here?? Like I said in my last post - WE'RE BUSY!

One thing that we always have in apocalyptic quantities in our house is chick peas. Because they're awesome. I don't ever need a special occasion to make hummus. I can pretty much eat it out of the jar with a spoon, as a spread on sandwiches, as a dip for fresh veggies, nacho chips or pita. Yum, yum, yum!

While looking for something to use my sad looking corn and jalapenos for, I found this gem. A couple of mods later, and there was hummus! (And then a few hours later, there was none!)

Hot Mess Warning: This will not be a Siobhan approved recipe. There will be no measurements. :)

For starters, I always pour a healthy amount of tahini into my food processor with a good splash of lemon juice and whip that first. It's the secret to creamy hummus! Then add in your drained and rinsed chick peas and pulse until coarsely chopped.

In the oven on low broil, I blackened the corn and at the end added the jalapenos. It took about 15-20 minutes. When they were done, I chopped the jalapenos and used a sharp knife to cut the corn from the cob and threw it all into the already coarse chopped chick pea mix. I turned on the food processor on low and started pouring in olive oil until the hummus was thick and smooth and lovely.

I didn't think to take a picture of it, though it was quite pretty. It's far too late now. But I did take a photo of the roasted jalapeno and corn. That'll have to do. Cheers!


Deep Fried Avocado Tacos

I don't know about you all, but avocados are one of my favourite foods. I eat at least one a day. I know that there are some people out there who panic and fret that "avocados are so high in fat, though! You shouldn't eat that many!", to which I reply PPPFFFFTTTTTTT.

When did fat become the enemy?? And is it the "fat" in avocados that people are afraid of or literally BEING fat? Either way, my PPPFFFFTTTTTTT still stands. I'm no professional or anything, but my motto when it comes to food is simple. Whole over Processed. Mostly in moderation (Because we all need a bag of chips and a bottle of wine for dinner now and again, or is that just me??) and get off your butt and DO SOMETHING. I'm not selling an illusion here; I'm not some primed Olympic athlete - but we walk the dog, go for family bike rides, cut the grass, work in the garden, work Cedar Row Farm as often as possible and just generally are busy people. I take the stairs  I deserve an avocado or two. :)

Now, onto the good stuff. I originally saw this recipe online somewhere, but it was very un-vegan. It called for buttermilk and loads of eggs. It really only served as inspiration for deep frying my own avocados so I don't feel schmucky not linking to it. As with most deep fried foods, you will need three bowls. That way you can make a really big mess and thrice the dishes.

Bowl # 1:
- 1/2 cup of flour
- 1 tsp garlic powder
- 1/2 tsp onion powder
- 1/2 tsp habanero powder
- 1/2 tsp dried cilantro flakes

Bowl # 2:
- 1 cup milk (I used unsweetened almond)
- 1 egg replacer (I used Ener-G, but Flax would also work)

Bowl # 3:
- 1 cup Panko bread crumbs
- 1 tbsp dried cilantro flakes (Because you can NEVER have too much cilantro!)

In a large heavy bottom sauce pan, heat about an inch and a half of oil medium-high. I don't have any fancy thermometers, I just splash some water in and when it fires back at me I know it's ready. Safety first! lol Depending on the size of your avocados, or your mouth I suppose, slice it in quarters or eighths.

Hot Mess Tip: Before you start frying, make sure you have a plate ready with paper towels to transfer them to. Also, you'll want to eat them right away so have your plates ready and waiting. I used corn tortillas, chopped iceburg lettuce, garden fresh tomatoes and fresh cilantro and green onion.

With your avocado sections, coat evenly in bowl 1, transfer to bowl 2 and then into bowl 3 for the Panko. Don't skimp on the Panko. Press it right into it! Repeat until all avocado is coated and ready to go. I laid mine out on a cutting board so that I could do them all at once but if you allow help in the kitchen there's no reason you couldn't use teamwork here.

You can use tofutti sour cream, or daiya cheez on your tacos but I wanted a rich, creamy, spicy sauce to top off my tacos with so I whipped up this:

3/4 cup Vegenaise
2 tbsp lime juice
2 tbsp Sriracha Hot Sauce
2 green onions, chopped. I used my herb scissors.
1 large bunch fresh cilantro, chopped with scissors

The end result? THIS.


Monday, 21 July 2014

Moxarella ON EVERYTHING!

Very rarely do I get THIS excited about things. (That may be an absolute lie.) but I am really REALLY excited. So excited in fact, that I just used caps locks on five words, including the title. Good grief!

Those who know me, know I'm not a big fan of faux cheeses. Actually, that's a little general. Specifically I don't like processed faux cheeses. They just taste so weird to me! I had good luck with the tofu ricotta for the stuffed shells. Then I saw this little gem and thought it was worth a try. I did not make the whole pizza recipe - just the moxarella. I had very low expectations. Very low. Almost non-existent.

But something beautiful happened. It was easy. Like, really, really easy. And cheap. Tapioca starch is only .99 cents for a lifetime supply and the cashew count is only 1/4 a cup. And friggin' delicious. It has the perfect mix of salt and tang and it's creamy and light and wonderful.

As the original recipe states it isn't a good replacement for a Caprese salad but baked it is 11/10.

Copied from One Green Planet:

  • 1/4 C. raw cashews 
  • 1 C. hot water (NOT boiling)
  • 2  T. + 1 t. tapioca starch
  • 1 small garlic clove, minced
  • 3/4  t. sea salt
  • 1 t. fresh lemon juice

After chilling it and using it on pizza with some tomatoes from our garden and a sweet basil base sauce I had lots left over.


I got to thinking. What if I roll them in a mix of panko and herbs and bake them? And then inhale them like my life depended on it? Yes please. The moxarella is really "sticky" so you'll need to wrap it in saran wrap. Oddly it doesn't stick to knives or other objects, just fingers. Anyhow, the breading was easy to make. On a silpat, or sheet of saran wrap mix:

1 cup panko crumbs
1/2 tbsp oregano
1/2 tbsp basil
1 tsp garlic powder

Cut the moxarella into "sticks" and roll into panko mix. They will flatten and roll out as you go. Repeat for as many as you'd like. Arrange on a parchment lined baking sheet, spray with canola oil (If you want them more like fried, as opposed to baked) and bake at 425 degrees for 5-7 minutes per side or until golden brown.


You can dip them in whatever you'd like. I made a quick vegan ranch dressing dip. This one's good.

Enjoy!

Dessert Pizza

Sometimes, something so simple can be so amazing. We were going for dinner with friends the other night and I needed to make a dessert to bring.

Maybe because I've baked so many cakes lately I'm all caked out. I wanted something would really 'wow' them. And then I thought of it. Dessert pizza! 

First I whipped up a batch of my fave chocolate chip cookies, but instead of dividing it up I rolled it out on a parchment lined cookie sheet and made my "pizza" base. You can either let the giant cookie air cool, or put it in the fridge or freezer to harden to be able to apply the next layer.

Then I used a tub of Almond Dream vanilla ice cream as the next layer. I spooned the entire tub into my food processor with 1 tbsp of almond milk and when it was smooth and spreadable I slathered it on the now cooled cookie and immediately got it into the freezer to harden while I prepped the next layers.

I had walnuts kicking around, but they weren't chopped so I worked my magic. Because I had previously made thick, rich bourbon caramel I got the cheat this next step. You will need to follow this link and make your own caramel :)

Now, to assemble!

Repeat after me. Cookie. Ice Cream. Chopped Nuts. Caramel. OM NOM NOM.


If you're feeling EXTRA fancy you can add a chocolate drizzle on top, as well. Perfection.


Saturday, 28 June 2014

Baked Buffalo Chick'n & Tofu Ricotta Stuffed Shells

Here's a little secret; I'm kind of oblivious. Like, really really oblivious. I can notice something relatively small and inconsequential, and yet I'll miss something blaringly obvious. I could tell you heaps of examples but then I'd just start feeling bad about myself and abandon this whole blog post. So for the sake of this recipe, instead I'll just tell you why I'm letting you in on this secret. 

I thought I bought faux chicken strips, but it was veggie ground chick'n. It was discounted so I bought all that was left. It was a good deal! The problem? What the hell was I going to do with 5lbs of veggie ground chick'n? 

The answer my friends, buffalo chick'n & cheez stuffed pasta shells. They're creamy and rich and have a wicked kick with the hot sauce. You're welcome. 

Tofu Ricotta:
1 package of firm tofu
1 tbsp garlic powder
1 tsp lemon juice
1 tsp oregano
1 tsp basil

Drain and press the tofu to get as much of the liquid out as possible. I wrapped mine in a tea towel and just hand squeezed. If you have a tofu press, good for you fancy pants. 

In a food processor pulse the dried tofu with all other ingredients and you're done! Wasn't that easy? :) Set uncovered in the fridge while you prep the rest. 

Ingredients:
1 package of jumbo shell pasta
2 packages of veggie ground chick'n 
1-2 tbsp olive oil
1 cup of buffalo hot sauce
A 9 x 13 lasagne pan/baking dish

In a frying pan, heat oil and brown the chick'n. You could and add onions or celery or other stuff but I didn't. Once it's browned add in the buffalo hot sauce and remove from heat. Place covered in a bowl and refrigerate until completely cooled. 

While the mixtures are cooling, pre-heat oven to 375 and boil water to cook the pasta shells. You will want to leave them al dente or they will be really mushy after you bake them. When they're ready drain and set aside. 

Mix the ricotta mixture with the chick'n mixture and spoon into pasta shells. Repeat and arrange in the lasagne dish. It's ok if they're crowded. 

Once the dish is full, bake for 20-25 minutes and then enjoy! 

You can add shredded Daiya on top if you like it, I just drizzled more hot sauce. 


Cheers! 

Tuesday, 24 June 2014

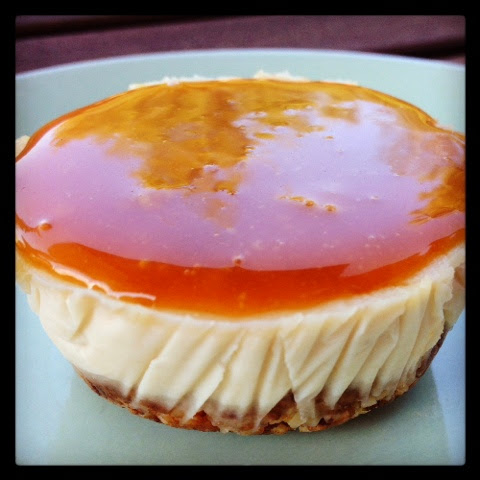
Caramel, Bourbon, Cheezecake. SOLD!

Bourbon? Yes.  Caramel? YES! On Vegan Cheezcake? Oh HECK YES!

Once in a while I get adventurous and try to veganize something that is really ambitious. Most of the time I go into it with the expectation that it will probably end up in the compost whilst I swear up a storm. Maybe even a few tears. Lucky for all of us, this latest experiment turned out to be Heaven on Earth. The only tears were tears of joy!

There are lots of vegan cheezcake recipes out there, but one in particular caught my eye. Thanks to The Minimalist Baker I got the base for a creamy, dreamy, super-duper cheezcake. It wasn't until I got to the Bourbon Caramel part of the recipe that my heart sank a little. Heavy cream? Dang!

Sidenote: There is nothing more frustrating than websites that are a mixed bag of recipe types.Sometimes I read recipe names and by the time I'm salivating and clicking away I realize that there's little to no chance of veganizing well...sigh...

One of the staples in our fridge is canned full-fat coconut milk. When you refrigerate full fat coconut milk the coconut cream will separate from the coconut water and you can do so many things with it. Add a little agave/maple/sugar or vanilla and whip it up. Few things beat coconut whipped cream. Then with the coconut water, save it and use it in smoothies. Delicious! Anyhow, I figured it was worth a try.

Ingredients:

2-3 tbsp bourbon
1 cup organic cane sugar
1/4 cup water
1/2 cup coconut cream

On medium heat, in a heavy flat bottomed pan add the sugar and water. DO NOT USE A UTENSIL. "Swirl" the pan around in clockwise and counter clockwise circles to keep the mix moving. If you don't do this, it will burn. The mixture should bubble and eventually brown. When it has a rich caramel colour remove from heat and stir in the coconut cream and bourbon. Return to warm element (It shouldn't be on, just warm) and using a silicon spatula stir and mix liquid well. Once it's all mixed well, pour it into a glass container and put in the fridge. It will be pretty thin right now, but in an hour or so it will be thick and caramelly. Resist the urge to pour it down your throat, but I won't judge you if you do. :)

Once your cheezcakes are set, top with this amazing vegan bourbon caramel and inhale!


Tuesday, 17 June 2014

Roasted Red Peppers!

Roasted red peppers are a staple in our house. They're great cold, hot, in a dish or on their own. Did you know how easy they are to make? Seriously! All you need is a large cookie sheet, some tin foil and a large mason jar.

Turn on your oven broiler to high.

Slice the peppers into quarters, and trim them so that they lay flat, skin side up.

Cover the cookie sheet with tin foil and arrange the peppers skin side up, close to one another but not overlapping. Broil for 10-15 minutes watching closely until all of the skins are evenly blackened. You may need to turn the cookie sheet or use tongs to rearrange depending on how your oven broils. 

When they are evenly blackened, remove from the oven and wrap tightly in the foil. This is to steam and soften the peppers. After about 30 minutes, open the foil and the skins will slide right off. :)

After the skins are shed, simply place in a mason jar and refrigerate for up to a month. They never last that long in our house! 


PS- I usually also broil zucchini and eggplant in addition. Roasted veggies are so versatile and with just a little olive oil they're healthy too! 

Suggested uses:
- Slice and add into pasta dishes
- Layer onto a sandwich with Vegenaise and other roasted veggies
- Top your fave pizza
- On it's own as an antipasti 

Happy broiling!